-

-
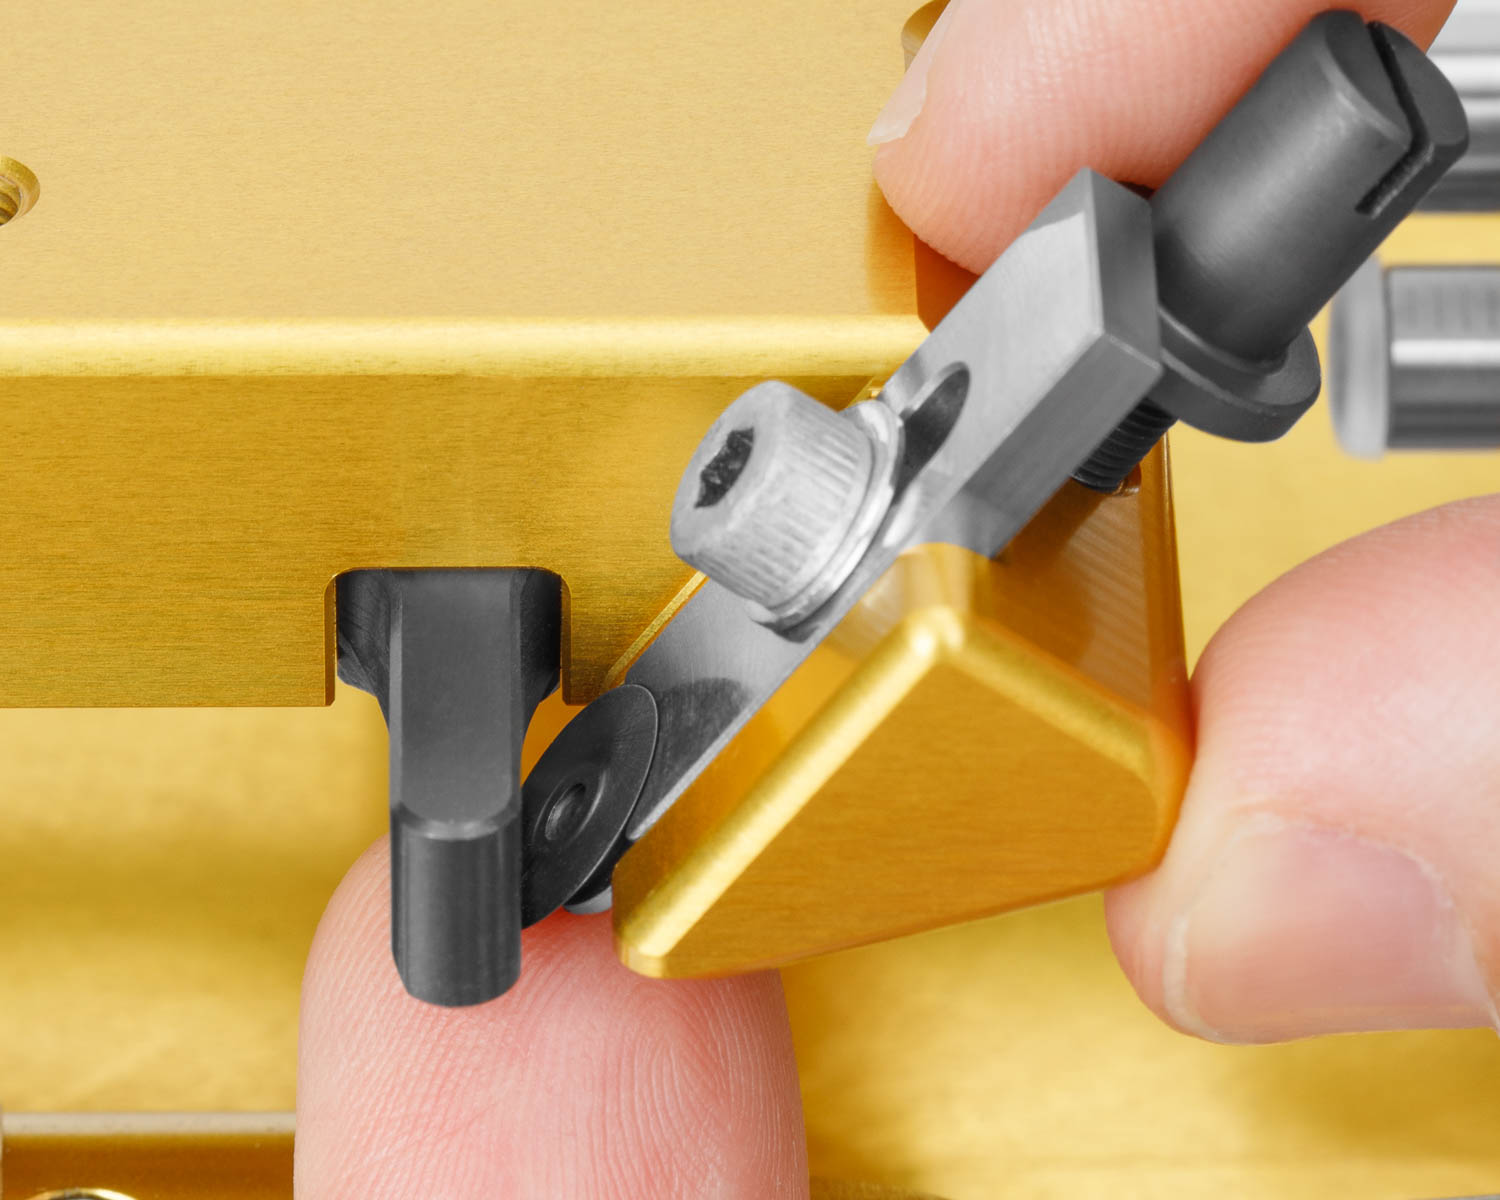
Loosen the set screw in order to adjust the travel at the tip of the reed. The adjustment screw with the silicon bumper can now be turned to adjust the stopping point at the tip of the reed.
-

-
The travel of the carriage should be set such that the blade goes just beyond the engraved line on the tongue. Then carefully re-tighten the set screw. The set screw has a plastic cap which can be damaged if over-tightened.
全体図
部分図
注意事項
メーキングマシンの刃物は非常に鋭利です。
ケガの原因になりますので、特にご注意下さい。
メーキングマシンは玩具ではありません。
お子様、心身障害の方は使用しないで下さい。
室内で使用して下さい。
ご使用の前に
運搬用ロックネジ(29)を外してから使用します。
使用方法
~リードの設置方法~
ブランクリード(プッペ)を水に浸し、刃の消耗を防ぐために削る部分の皮を剥きます。
リードを完成の長さにカットし、マンドレル(11)にリードのチューブをしっかりと挿します。
ネジ(14)を締め、マンドレルを固定します。
リードの先端はプラークに挟み、印※に合わせます。
センタリングに注意を払いながらクランプ (4)でリードを固定します。
※プラークの印について
- 一番テンプレート側の印→先端を長めにしたい場合
- 真ん中の印→標準の長さの先端
- 一番マンドレル側の印→先端を短めにしたい場合
仕様により印は異なります。上記はプラークの印が3つのタイプの例。
~削り方~
(26)を持って、削りユニット(1)全体を前方に動かし、レバー(10)を回して、角度を変えながらリードを削る。同時には動かさず、削ってから回すを繰り返して下さい。
はじめに先端2~3ミリの部分を削り、リードの開きが落ち着かせてから、スクレープ全体を削ると、より正確になります。
先端の厚さが程よいのに試奏した結果、吹奏感が重すぎる場合は、クランプを緩めて再度削って下さい。
クランプを緩めるとプラークの根元が持ち上がり、スクレープの削り出しが薄くなります。
リードの厚さの調整
(20)のダイヤルで厚さを調整できます。固定ネジ(21)を緩めてから調整して下さい。
ダイヤルの一目盛りは0.01mmです。
上から見て時計回りはリードが厚くなり、反時計回りはリードが薄くなります。
リードや刃、プラークの損傷を防ぐために、必ずキャリパーで先端を測りながら少しずつダイヤルを回して下さい。
調整ができたら固定ネジ(21)を締めます。固定ネジは、プラスチックですので強い力はかけないで下さい。
先端の長さの調整
テンプレート(7)を動かすことにより先端の長さを調整できます。
(15)のネジを緩めテンプレート(7)をプラーク(9)の方向にずらすと、先端は長くなります。(27)の目盛りが目安になります。
スクレープも同時に変化するので、必要に応じてスクレープの長さも次の項目を参照し、調整して下さい。
スクレープの長さの調整
スクレープ金具(8)を動かす事によって、スクレープの長さが調整できます。
固定ネジ(16)を緩め、スクレープ金具(8)をプラーク(9)の方向に動かすとスクレープは長くなります。
Adjusting the Carriage Travel
In order to adjust how far the carriage, and therefore the blade, can travel at the tip of the reed, follow these steps:
In order to adjust how far back the carriage travels, especially after adjusting the scrape limiter, follow these steps:
-

-
Loosen the set screw in order to adjust the travel at the end of the scrape. The adjustment screw with the silicon bumper and ruler can now be turned to adjust the stopping point at the end of the scrape.
-

-
The travel of the carriage should be set such that the ball bearing for the thickness adjustment stops before entering the opening on top of the scrape limiter. Then carefully re-tighten the set screw. The set screw has a plastic cap which can be damaged if over-tightened.
テンプレートの交換
固定ネジ(15)を外すとテンプレートを取り替えられます。刃物が絶対にプラークに当たらないように、リードの厚さ調整の項目を参照し、厚さを調整して下さい。
Setting up or reseting a template
The following tables provides the most crucial measurements for setting up the templates on the profiling machine.
Before scraping with a new template, make sure to check the thickness settings so the blade does not come in contact with the tongue.
The length of the tip can be adjusted by moving the template.
-
-
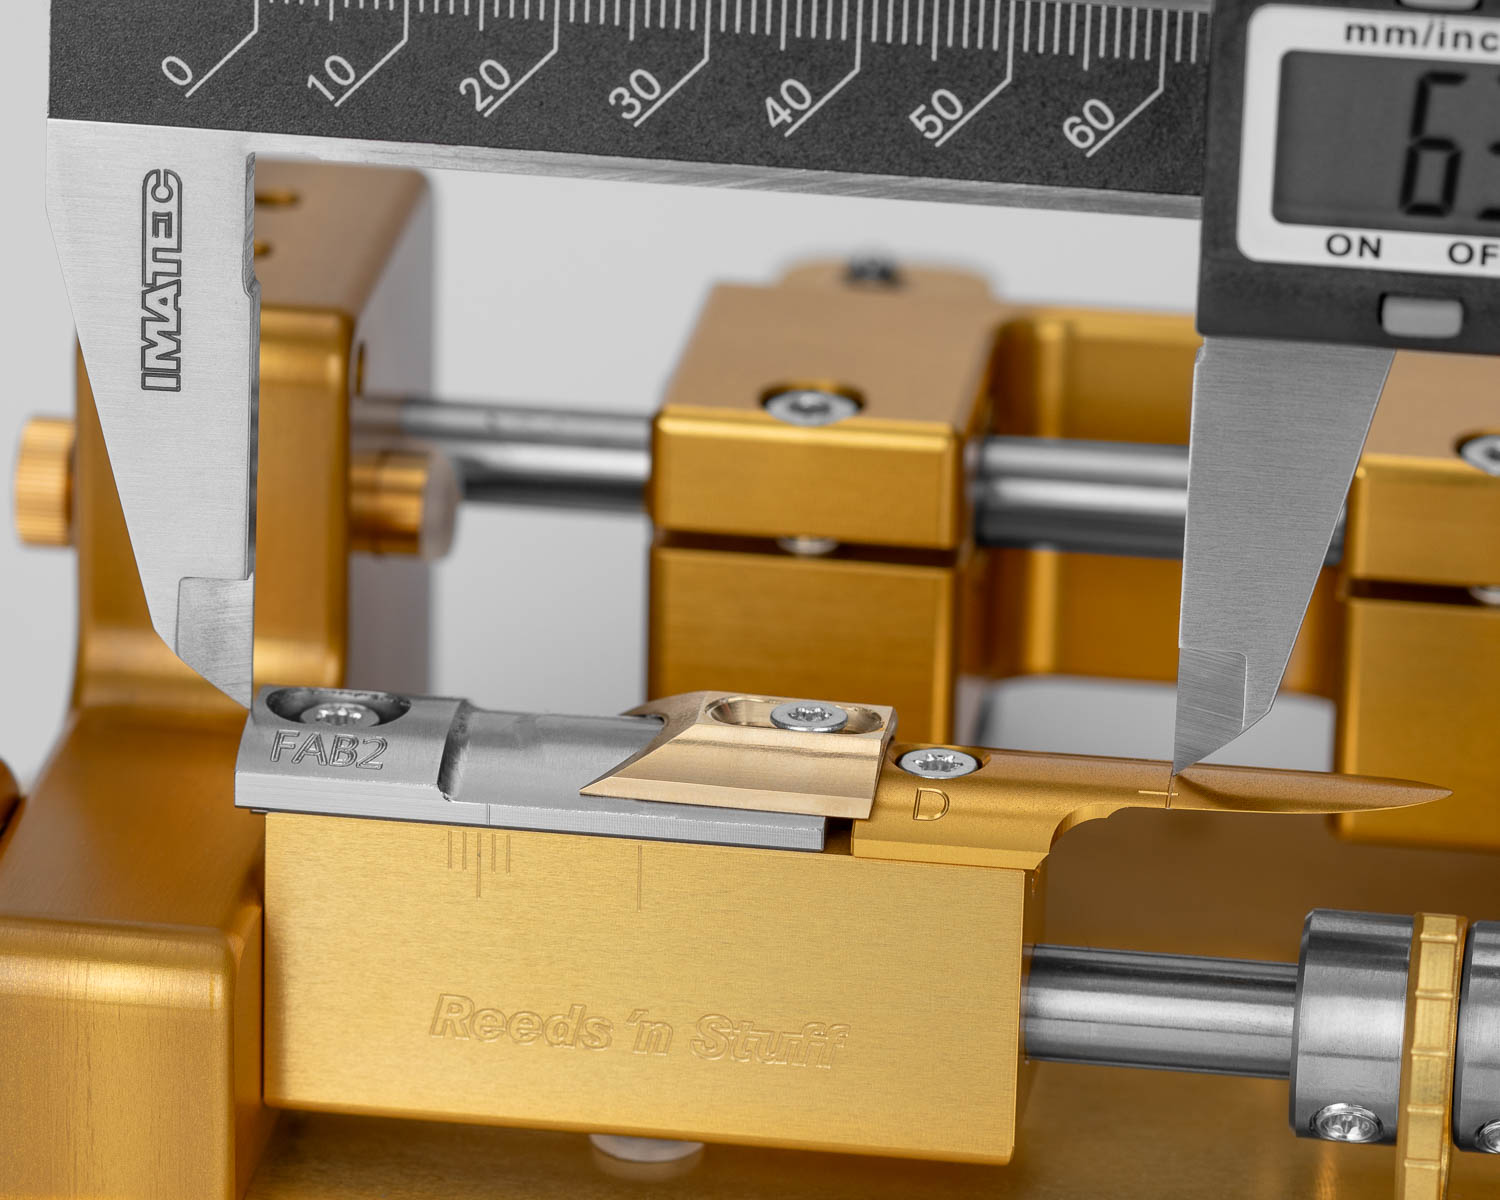
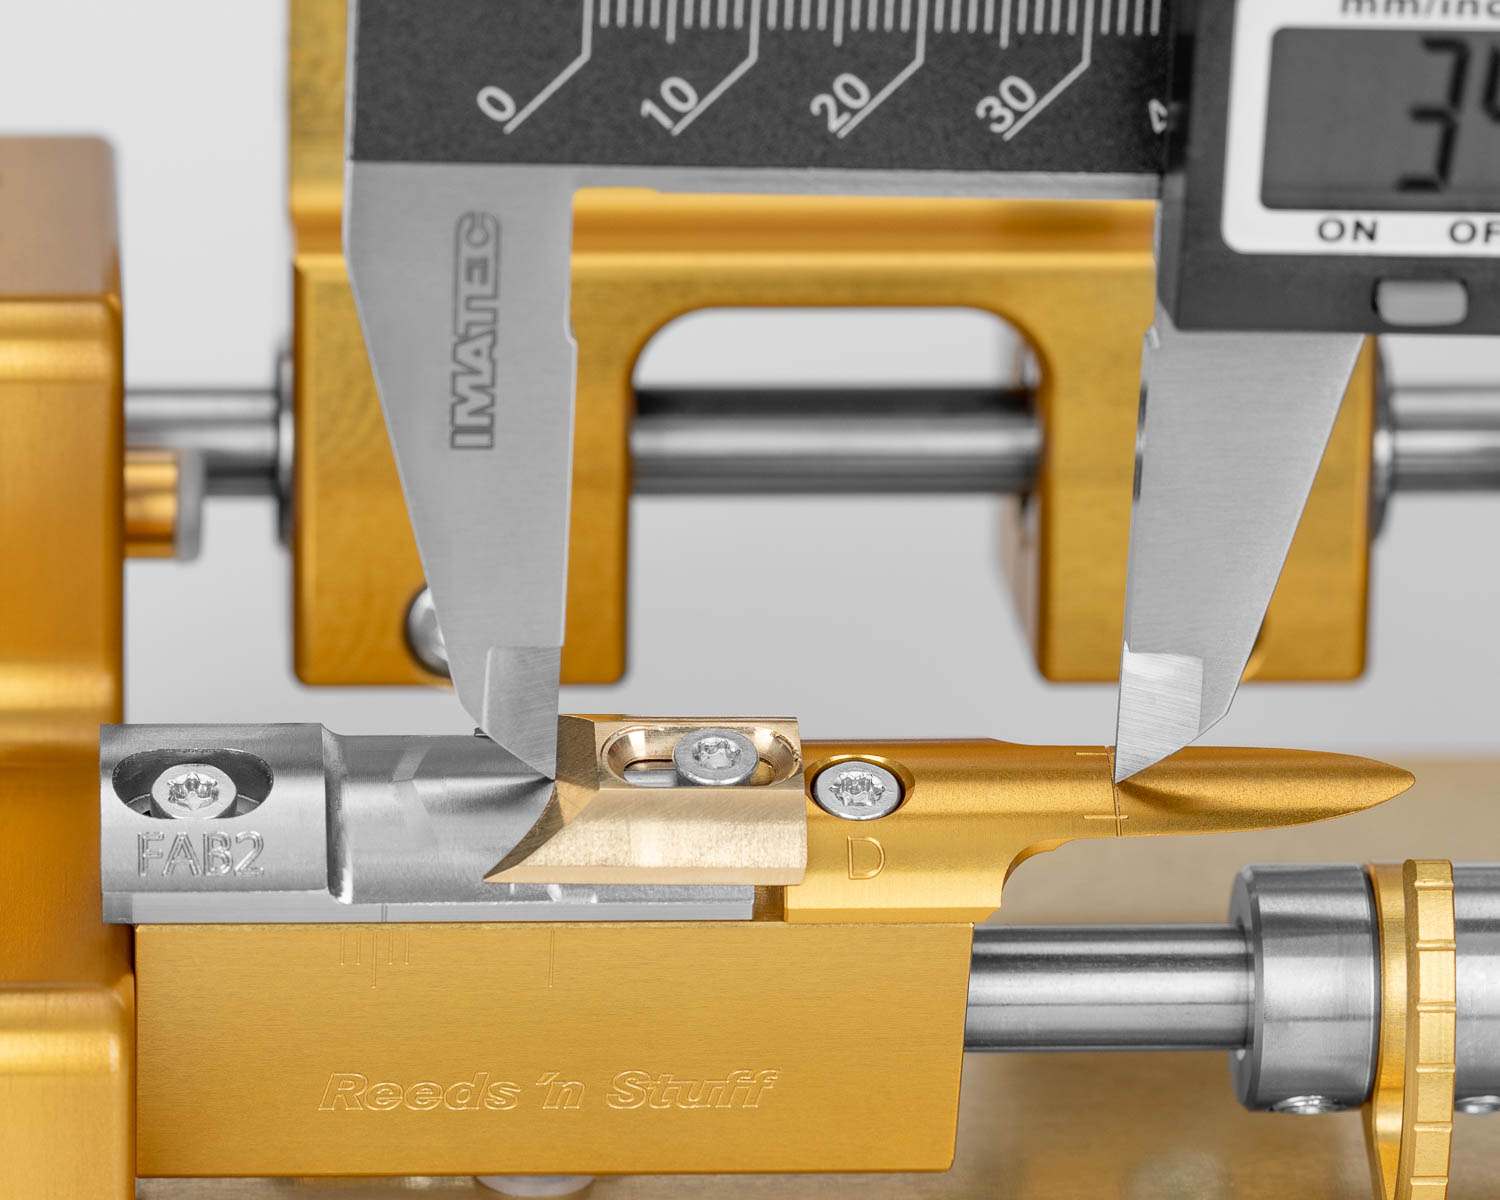
The position of the template (Distance to Line) is measured with a caliper from the far end of the template to the engraved line on the tongue.
-
-
The position of the scrape limiter can be measured with a caliper from the deepest part of the scrape limiter to the engraving line on the tongue.
Machines delivered from the factory are set up with a length of scrape of 10.50 mm for oboe, and 12 mm for English Horn.
For a scrape of 10.50 mm, set the scrape limiter at 34.90 mm to the engraving line on the tongue.
For a scrape of 12 mm, set the scrape limiter at 32.40 mm to the engraving line on the tongue.
Machines delivered from the factory are set up with these measurements and the dial then calibrated to 10. This corresponds to a thickness of 0.10 mm at the tip of the reed (on US-style templates this measurement is taken off-center to account for the spine).
Oboe
| Template |
Distance to Line |
|---|---|
| 17 | 63.20 mm |
| 20 | 63.90 mm |
| 22 | 62.80 mm |
| 24 | 62.80 mm |
| 33 | 63.20 mm |
| 36 | 62.50 mm |
| 60 | 62.90 mm |
| 901 | 62.80 mm |
| ADAM | 63.00 mm |
| ALBI | 63.50 mm |
| ANA | 63.25 mm |
| AO | 63.50 mm |
| AO1 | 63.20 mm |
| CD5 | 63.50 mm |
| CGG | 63.50 mm |
| CR2 | 63.60 mm |
| DNAN | 64.00 mm |
| DW | 63.70 mm |
| FAB2 | 63.00 mm |
| FT | 63.30 mm |
| GREG | 63.20 mm |
| J | 63.10 mm |
| JLC | 62.80 mm |
| KUN | 62.70 mm |
| LORY | 62.90 mm |
| MAU | 62.80 mm |
| MT | 63.20 mm |
| NC | 63.10 mm |
| NCV | 63.10 mm |
| NSD | 63.00 mm |
| WITT | 63.40 mm |
English Horn
| Template |
Distance to Line |
Distance to Scrape Limiter |
|---|---|---|
| CA2 | 63.10 mm | 32,40 mm |
| CA3 | 63.50 mm | 32,40 mm |
| E70 | 63.60 mm | 32,40 mm |
| JC | 62.30 mm | 32,40 mm |
| LOW | 63.40 mm | 32,40 mm |
| MHO | 63.00 mm | 32,40 mm |
| NICO | 62.70 mm | 32,40 mm |
| SPS | 62.70 mm | 32,40 mm |
Oboe & English Horn US
For US templates, place the template all the way to the right, up against the tongue. The scrape limiter is placed as far right as possible.
Viennese Oboe
| Template |
Distance to Line |
Distance to Scrape Limiter |
|---|---|---|
| 22A | 64.38 mm | 33.70 mm |
Historical Oboe
| Template |
Distance to Line |
Distance to Scrape Limiter |
|---|---|---|
| BAK | 62.00 mm | 29.80 mm |
| BAL- | 61.90 mm | 29.40 mm |
| BPF- | 59.15 mm | 26.45 mm |
| BTL- | 59.70 mm | 26.90 mm |
| SHO | 63.00 mm | mm |
| STB | 62.20 mm | 30.10 mm |
プラークの交換
固定ネジ(17)を外してプラーク(7)を変えられます。刃物が絶対にプラー クに当たらないように、厚さ調整の項目通り、厚さを調整して下さい。
ダイヤル(20)の調整
ダイヤルの数値を先端の厚さの数値に設定する事ができます。(21)は締めたまま、(28)を緩めて(20)を先端の数値に合わせ、(28)を再び締めます。 プラスチックのネジですので強い力はかけないで下さい。
Replacing and Adjusting the Blade or Blade Holder
Loosening or removing the set screw will enable the blade (or blade holder for the Blade 360) to be replaced or adjusted. Adjusting the blade position works best when the set screw is snug against the blade or blade holder, as this light friction will ensure that the blade or blade holder is not moving too much at once.
After replacing or adjusting the blade or blade holder, re-tighten the set screw firmly so that the blade is securely fastened.
Once the blade or blade holder has been replaced or adjusted, and the set screw tightened, please ensure that the blade does not come into contact with the tongue. This could damage the blade and the tongue.
Adjusting the blade or blade holder is best done with the use of a Blade Adjustment Indicator, as achieving the ideal shaving thickness of 0.03 mm is nearly impossible without the aid of a dial indicator.
360°ブレードを回転させてください
-

-
刃を回転させるには、下側のネジを緩める。
-
-
丁寧に刃を鋭い箇所まで回転させる。
-

-
刃を指で押さえながら、ネジを閉める。
注意! ネジを力任せに締め付けないでください。ネジやネジ回しが損傷を受ける可能性があります。
クランプの調整
クランプの位置も調整可能です。(18)を緩める事によって、クランプを前後に動かせます。刃がクランプに当たらないように必ず確認して下さい。